Your proven solution to improve balance and reduce fall risk

Quick Guides

Thanks for using StandingTall at your workplace! 

As a trained Healthcare Professional (HCP) or Resident Expert, here's what you need to know: 

  • HCP: You’ll identify clients for the program, assign the clients to the list of user accounts that have been premade, book appointments, introduce them to StandingTall, monitor their exercise history, and progress. 
  • Resident Expert: You’re the go-to StandingTall expert on the team! Troubleshoot FAQs, handle common issues, and guide your team. Contact us anytime for support. 
     

Next Steps (after your training day)

  • Look for the green Quick Guides tabs below for an easy step-by-step guide. We also recommend reading 'About StandingTall's Balance Exercises' to learn more about the exercises and how they can be modified. 
  • For the next 6 months, introduce as many clients as possible to StandingTall— there are no limits! All clients are to be given their own username and password from the list provided. We recommend keeping this list in a central location. 
    Clients enrolled by the end of the 6-month period will have access to the program for up to two additional months. No need for the client to sign an informed consent; data is collected at the clinician level. 
  • If you are using the iPads we've loaned out, don't forget to keep a record to track them. Let us know if you need more iPads. 
  • We’ll check in after 3 months, but feel free to contact us at anytime for support. 

Good luck!

About StandingTall's Balance Exercises

The StandingTall program includes over 150 unique balance exercises, each of which have a range of progressions to provide variety to the training program. The exercises are divided into four main categories:   

  • Floor exercises consist of static and dynamic balance exercises performed while standing on the floor.   
  • Foam exercises consist of static and dynamic balance exercises performed while standing on a foam pad (or alternatively a seat cushion or folded towel). 
  • Dartboard stepping exercises require stepping in different directions on a dartboard pattern, always starting from and coming back to the centre with every step. 
  • 4 x 4 grid stepping exercises require stepping in different directions on a 4 x 4 grid pattern, following a path and therefore starting and finishing in a different spot.

CATEGORY I: Floor Exercises

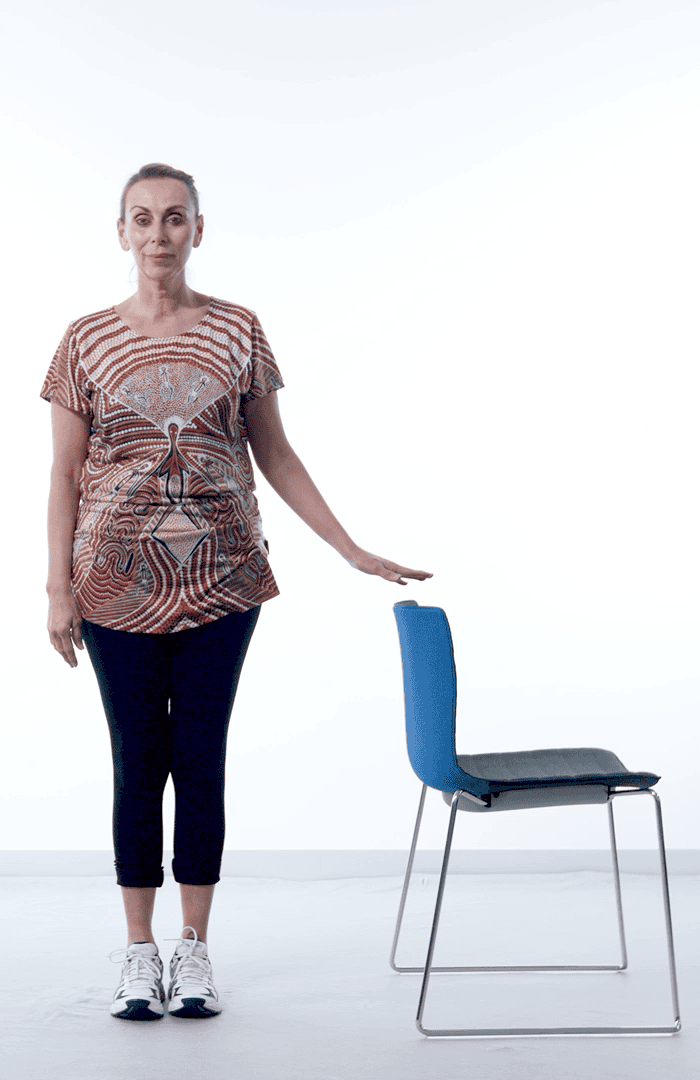
Various strategies are used to progress the floor exercises across 10 checkpoints, such as: increasing duration, reducing visual input, and directional changes for dynamic exercises. Here are some examples how floor exercises progress: 

Checkpoints 1-4:

Standing Feet Together > Near Tandem
Leaning Side-to-Side > Lean and Reach

Checkpoints 5-7:

Tandem Stand > Tandem Stand (Eyes Closed)
Lean Forward and Back (Near Tandem) > Feet Hip Width

Checkpoints 8-10:

Standing Near Tandem - with Head Turns
Heel Raises - Standing on One Leg
Walking Backwards
 

CATEGORY II: Foam Exercises

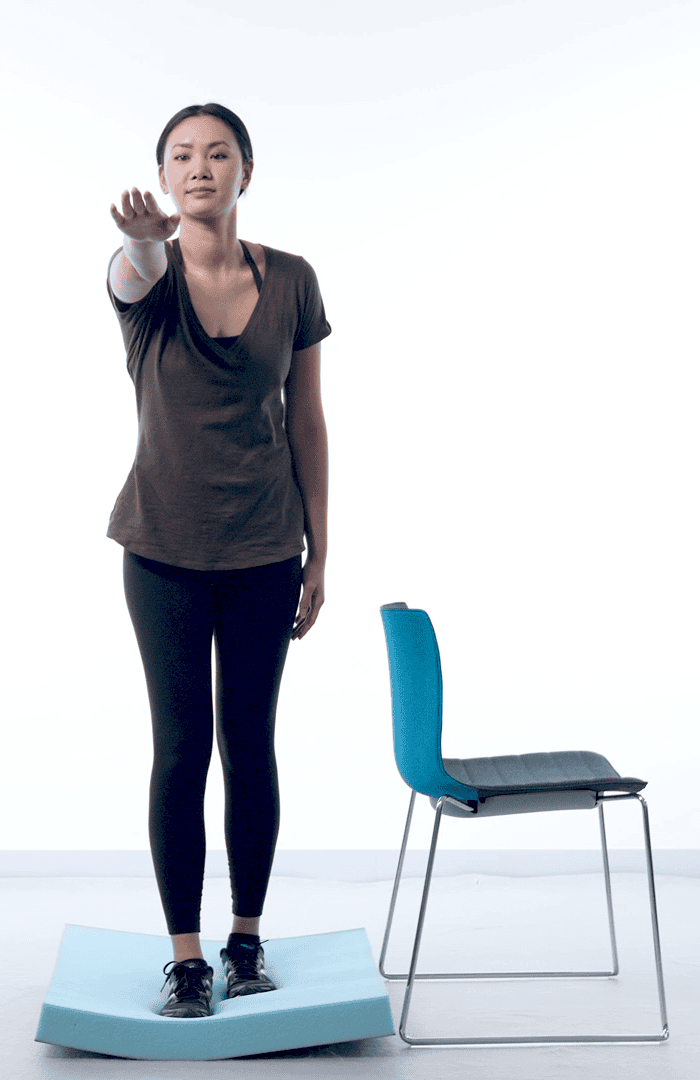
Various strategies are used to progress the foam exercises across 9 checkpoints, such as: increasing repetitions, reducing base of support and introducing dynamic movement (reaching). Here are some examples how foam exercises progress: 

Checkpoints 2-4:

Standing on Foam - Feet Hip Width > Feet Together
Standing Reaching on Foam - Feet Hip Width

Checkpoints 5-7:

Standing on Foam - Near Tandem > Tandem
Standing with Reaching on Foam - Near Tandem

Checkpoints 8-10:

Standing with Reaching on Foam - One Leg
Lean & Lift Side-to-Side on Foam

CATEGORY III. Dartboard Stepping Exercises

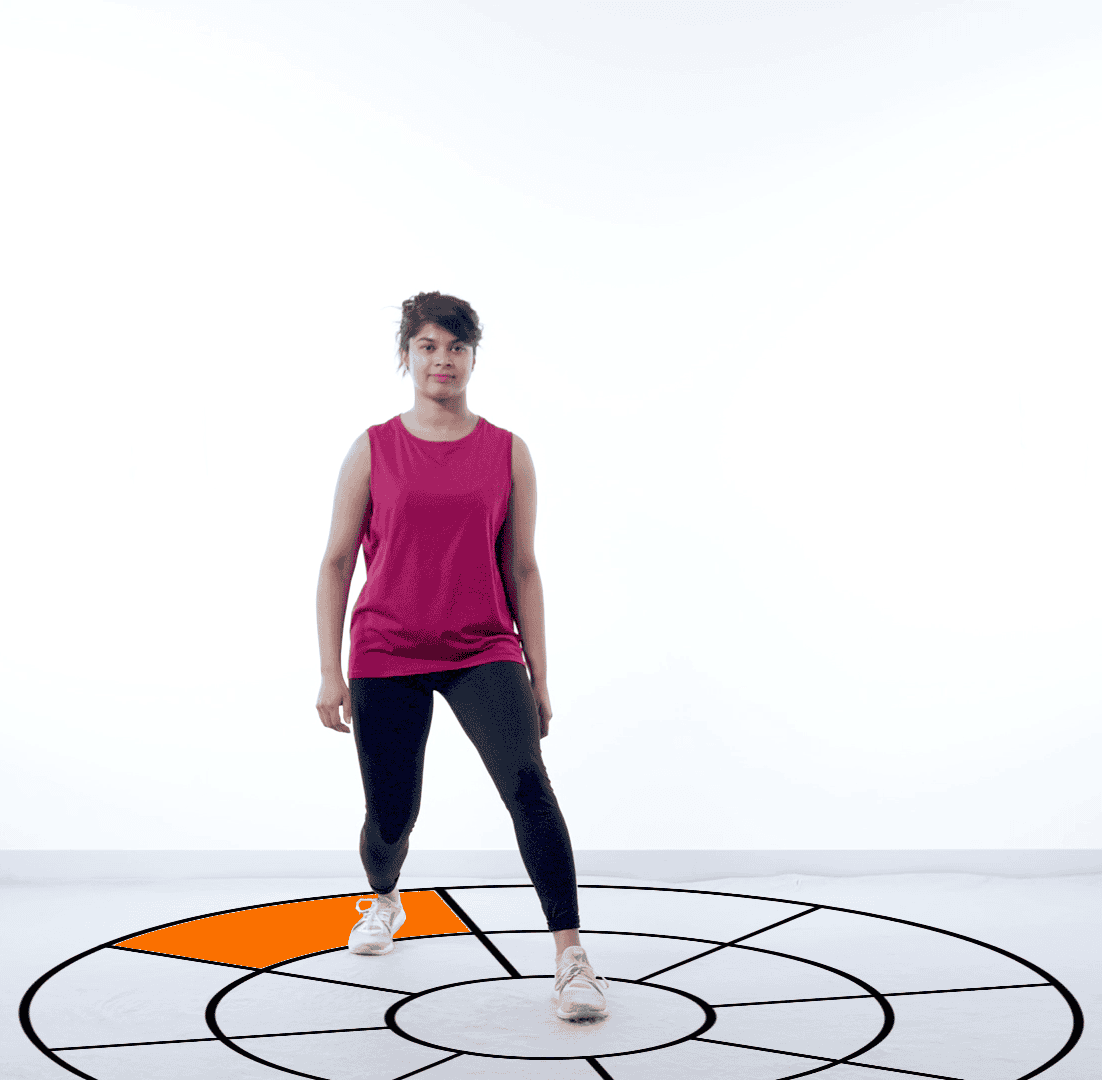
Various strategies are used to progress the dartboard stepping exercises across all 15 checkpoints, such as: increasing tempo and the number of directional changes and reducing predictability of stepping direction. Here are some examples how dartboard exercises progress: 

Checkpoints 1-5:

Step & Rock (short steps, limited directions) > Step & Lift (long steps, more directions)

Checkpoints 6-9:

Step & Lift (faster tempo)
Step & Bend (random tempo)

Checkpoints 10-15:

Dual Task Stepping Exercises (all directions)

CATEGORY IV. 4 x 4 Grid Stepping Exercises

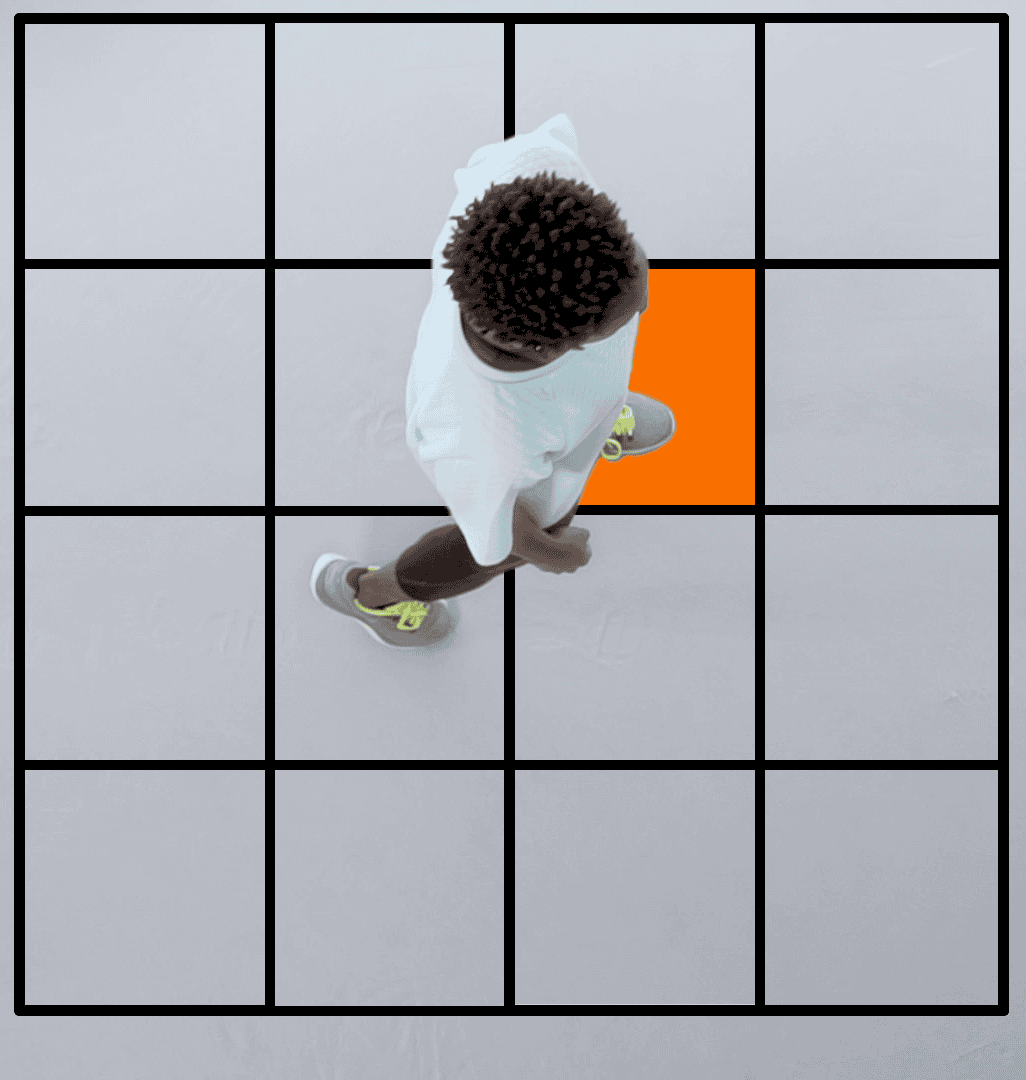
Various strategies are used to progress the 4x4 Grid stepping exercises across all 15 checkpoints, such as: increasing tempo and step length and changing the stepping action. Here are some examples how grid exercises progress:

Checkpoints 1-2:

Stepping in the Grid > Walking in the Grid

Checkpoints 3-9:

Stepping and Walking in the Grid from 1-11 points (directions)
Single Task Exercise 

Checkpoints 10-15:

Dual Task Grid Exercises: remembering a path, reaching a target

Providing a Client with a StandingTall Account

After completing your StandingTall training, you will have received an email titled ‘StandingTall Training – Thank You and Next Steps.’ 

Attached to the email is an Excel file named ‘StandingTall_User Accounts'. This file contains a list of user accounts for your team to use when introducing StandingTall to new clients. We recommend saving this file in a shared, central location for easy team access. 

Each account includes login IDs and passwords, which you will provide to your client. They will use these credentials to access the StandingTall app. When you're ready to introduce StandingTall to a client, simply mark the available account to indicate that it is in use, to avoid duplication.

All you need to do now, is book an appointment with your client to introduce them to the program!  

If the client has an iPad, read the ‘Downloading StandingTall’ quick guide before proceeding to the ‘StandingTall Guide for Healthcare Professionals’. If they are using a loaned iPad, the app is already installed and you can go directly to the ‘StandingTall Guide for Healthcare Professionals’. Good luck!

Downloading StandingTall

Downloading the StandingTall app   

If using a loan device, the StandingTall app will already be installed. Proceed to reading 'StandingTall Guide for Healthcare Professionals'. This is the step-by-step guide to your first appointment for StandingTall.

If using the clients own iPad, continue reading the process below: 

You will require an internet connection for this process.  

  1. On your iPad, open the app store and type ‘StandingTall’ in the search bar. You will be presented with the following screen.

  2. Tap on ‘Get’ for the StandingTall app outlined in the image above, then tap on ‘Install’.  
     
  3. You will be prompted to sign in with your Apple ID.  
    1. If using a personal device, input your Apple ID password to authorise the transaction/complete the purchase. As StandingTall is a free app, a payment method is not required to be set up prior to installation. Reassure the client that the app is free, but this is part of the App Store process to download any app.  

      Screenshot 2024-07-24 154255.png

      Now, you can proceed to the 'StandingTall Guide for Healthcare Professionals'. This is the step-by-step guide to your first appointment for StandingTall!

StandingTall Guide for Healthcare Professionals

StandingTall Guide: first appointment with your client 

Before starting: 

Client space needs Other items needed 
  • Have adequate room to perform exercises and be free of trip hazards.  
  • Have the iPad viewable at eye level when performing the exercises. 
  • Internet connection (hotspot if needed); 
  • Chair, bench, or something sturdy to use as a support; 
  • Foam pad/folded towel/cushion to act as an unstable surface for Foam exercises. 

Client has an iPad: assist the client in downloading the StandingTall app. For instructions, view the ‘Downloading StandingTall’ Quick Guide. 

Client is being loaned an iPad: the StandingTall app is already downloaded on to the clients loaned iPad. 

Login instructions 

Once the app is downloaded, open the app to log in: 

  1. Click on ‘I am an existing user’   
  2. Enter the client's assigned user ID and password

    These credentials are in the list of user accounts (from Providing a Client with a StandingTall Account' guide. This should be in a shared, central location for easy team access. Ensure you mark the user account to indicate it is in use.

    Tap ‘Show password as plain text’ to ensure the password is entered correctly. 

  3. Tap on ‘Login’. Don't forget to provide the client with their login details. 

1. Balance Assessment

Start here first. The first Balance Assessment determines the starting level for the user, and occurs monthly to ensure the exercises remain challenging, yet safe. On the main menu, tap 'Do a Balance Assessment' and follow the on-screen instructions. You will need a folded towel, or large cushion as a substitute for the Foam (read more below): 

  • There are 5 positions on the floor, followed by 5 positions standing on foam. Only positions on the floor that are held for > 15 seconds will be repeated on the foam.  
  • ‘How to perform this exercise’ is available to watch the demonstration video. 
  • If a position isn’t held for 30 seconds (ie. Needing to hold on to chair/losing footing), tap on ‘Tap to stop balancing’ and/or manually ‘Change Duration’ to the time they lost their balance using the drop-down menu. 

2. Trial session: i. Floor > ii. Foam > iii. Box (skip) > iv. Dartboard > v. Grid > vi. & vii. Cognitive exercises (skip). 

Next: the Trial session. It is a demonstration of the types of exercises a user will experience with StandingTall. The client won’t need to view Trial Session again after this appointment. There are 7 beginner-friendly exercises that will take the client through the same flow of categories as a regular balance session. NOTE: Box and Cognitive exercises are disabled and will not appear in the clients Exercise program. Tap on the ‘Skip’ button to bypass these exercises in the Trial Session.

3. Exercise 

Finally, for this appointment, complete 1 exercise (3 sets) with the client to ensure they are comfortable with navigating an exercise session independently. 

To start a session, select ‘Exercise’ on the main menu. Leave the exercise session type on 'Balance' (if the client desires more variety, they can access other session types independently). Select an exercise duration. This is the exercising duration, not session duration. Double the selected time for an estimate on session duration. For the first session, you are only completing 1 exercise, session duration selection isn’t an important factor. 

All items on the Safety Checklist must be confirmed before starting exercise.  

Show the client What’s on the Exercise screen 

  • Exercise Title: Walking Sideways – Long Steps 
  • How many Exercises in the session (1/11), which set (1/3) the user is up to (all exercises are performed 3 times in a row) and the duration (26 seconds) of each exercise. 
  • The Foot Position for each exercise is shown in a grid in the top right corner. 
  • How to perform this exercise includes a demonstration video and a quick refresh guide for each exercise.  
  • Tips & Hints explain why you are doing the exercise and how to make it easier or more challenging. The session is paused when viewing the tips and hints, and demonstration videos.   
  • Exercises can be paused during an exercise, by watching instructional videos, or reading ‘Tips & Hints’. A session will run for 120 minutes (2 hours) before the session expires. 


  • After 3/3 sets, rate the exercise – this determines if the exercise progresses (4 or 5), maintains level (2 or 3) or regresses for the next session (1). 
  • Exit a session early by clicking ‘Return to Home’ & ‘Save & Quit’. This will save the time that was spent exercising.  
  • The weekly exercise target begins at 40 mins, and gradually increases every fortnight to reach 120 mins (the full exercise dosage). 
  • Other items on the Main Menu are optional. Further information can be found in the Comprehensive Guide

StandingTall Guide for support person or family member

StandingTall Guide for support person or family member 

StandingTall is a digital exercise program for improving balance and mobility in older adults. It is recommended users do at least 2 hours of balance exercise training per week to improve balance and reduce the risk of falling.  

Before starting: 

Ensure the user has a safe, and practical space to exercise; and a chair or something sturdy to hold on to for support. Try and set the iPad up as close as possible to eye-level. StandingTall includes some exercises done on an unstable surface, called ‘Foam’. The foam can be substituted for a folded towel or thin cushion.  

Login instructions 

Open StandingTall app on the iPad. If you aren’t prompted to log in, skip to ‘1. Balance Assessment’. 

  1. Click on ‘I am an existing user’
  2. Enter the user ID and password (these details will have been provided to the user by their StandingTall trainer).
  3. Press ‘Login’.

1. Balance Assessment 

From the Main Menu- if the button prompts you to ‘Do a Balance Assessment’, tap this and follow the on-screen instructions. Exercise sessions are accessible once this is complete. If the button reads ‘Exercise’, it is not yet time to complete the Balance Assessment. Read on from ‘3. Exercise’. 

The first Balance Assessment determines the starting level for the user, and occurs monthly to ensure the exercises remain challenging, yet safe. There are 5-10 positions that the user will need to try and hold for up to 30 seconds.  Any floor positions that are held for <15 seconds will not be repeated on the foam/towel. If you lose your footing, or need support from a chair, tap 'Tap to stop balancing’, or 'Change Duration’. 

2. Trial session 

The Trial session is a demonstration of the types of exercises a user will do with StandingTall. If this has already been completed, they do not need to complete this again. Continue reading from ‘3. Exercise’. 

There are 7 beginner-friendly exercises that will take the user through the same flow of categories as a regular balance session: 

i. Floor > ii. Foam > iii. Box - SKIP > iv. Dartboard > v. Grid > vi. & vii. Cognitive exercises - SKIP.  

NOTE: Box and Cognitive exercises are disabled and will not appear in the Exercise program. You can press the ‘Skip’ button to bypass these in the Trial Session.   

3. Exercise 

To start a session, select ‘Exercise’ on the main menu. Leave the session type on 'Balance' to improve falls risk. For variety, the user can explore the Cardio & Strength sessions. Then, choose the exercise duration the user would like to exercise. The exercise duration refers to exercising time, not session duration. Session duration is double the time selected. All items on the Safety Checklist must be confirmed before starting exercise.  

What’s on the Exercise screen 
 

  • Exercise Title: Walking Sideways – Long Steps 
  • How many Exercises in the session (1/11), which set (1/3) the user is up to (all exercises are performed 3 times in a row) and the duration (26 seconds) of each exercise. 
  • The Foot Position for each exercise is shown in a grid in the top right corner. 
  • How to perform this exercise includes a demonstration video and a quick refresh guide for each exercise.  
  • Tips & Hints explain why you are doing the exercise and how to make it easier or more challenging. The session is paused when viewing the tips and hints, and demonstration videos.   


  • After 3/3 sets, rate the exercise – this determines if the exercise progresses (4 or 5), maintains level (2 or 3) or regresses for the next session (1).  
  • Exercises can be paused during an exercise, by watching instructional videos, or reading Tips & Hints. A session will run for 120 minutes (2 hours) before it expires. 
  • Exit a session early by clicking Return to Home & Save & Quit. This will save the time spent exercising. 

Your weekly exercise target starts at 40 mins and will gradually increase to 120 mins. Other features on the Main Menu are optional, and you are welcome to use the ‘Calendar’ & ‘Goals & Journal’ features, see how you’re progressing with your balance & exercises in ‘Progress’, and read FAQ in ‘Help’.  

CMS Guide for Healthcare Professionals & Resident Experts

Guide to using StandingTall’s Content Management System (CMS) 

Click the link above to login, using your work email address, and password Exercise000. Contact the team if you need assistance.

Once you have introduced StandingTall to your client, use the CMS to monitor your client’s exercise history and progression.  

In special circumstances, you may need to modify the program (eg. Injury, recovery, going on holiday etc.). Read more about this under 'Modify a client's exercise program'

If the client has no internet connection, help the client hotspot their iPad to your internet during every visit. This will push their exercise data to be uploaded to the CMS where you can monitor their history, & progression. 

Monitoring a client’s exercise history & progression  

Go to ‘Users & Patients’ > Patient to search for your client (by email address, or by Cohort filter). There are 3 methods, starting from quickest overview, to most detailed report summary.

  1. View general exercise history from your clients in the cohort from the Patient dashboard list. Use this for a quick way to check their exercise history in the last fortnight.  
    Percentage of exercise adherence can be seen under columns titled: 

    a. TW = this week (Monday to current day) 
    b. -1W = last week (Mon-Sun) 
    c. -2W= last fortnight (Mon-Sun) 

  2. View the cohorts summary report: Use this to view all clients in the cohort in an excel spreadsheet. This spreadsheet will contain exercise program details for each client's exercise checkpoints, exercise times, reasons for no adherence, and average ratings. 

    a. Filter By Cohort (in the orange bar). This will be your sites name eg. HammondCare ST. 
    b. Click the 3 vertical dots near the search bar & click ‘Export .csv’. An excel spreadsheet will download. Open this and highlight your clients to check their program details.   

  3. View an individual summary report: Use this when you want to view how an individual client has been progressing with their balance since the start of their StandingTall journey. 

    a. Click on the client from the Patient dashboard list, and select ‘Download Patient’. An excel spreadsheet will download. 
    b. This spreadsheet will contain detailed exercise program information: all balance assessment times, exercise adherence (weekly & daily), exercise checkpoints, all exercises average rating, date attempted, chair/weight usage, etc. 

Modify a client’s exercise program 

  1. Go to Users & Patients > Patient to find your client. 
  2. Click on the row with your clients Email address.  
  3. In the pop-up window, click on their ‘Exercise Settings’ tab.  
  4. Modifying a client's program: The Balance program does not include cardio or strength. You do not need to modify cardio or strength exercises.

    a. There are 3 options to modify their exercise program: 

i. Make an exercise type easier/harder: Increasing/decreasing the ‘Current Checkpoint’. Changing the Current Checkpoint will make an exercise harder (increase), or easier (decrease). In/decreasing the checkpoint by 1-2 numbers to see what exercise tiles become active (maroon tiles) or inactive (red tiles) in the clients program. 

ii. Remove an Exercise Type from their program: you can do this by Disabling Exercise type. While the Box exercise should always be inactive, other exercise types can be disabled (and re-enabled at any time). You can modify a program this way if a client is recovering from an injury/surgery. You cannot remove an individual exercise. 

iii. Prevent the program from progressing too quickly: to do this, Set a ‘Max Checkpoint’. The exercise category won’t progress beyond the set Max Checkpoint. This method will be useful if you want to ensure the client progresses at a slower pace. Setting a Max Checkpoint will require regular follow-up with the client (so you can determine whether the Max Checkpoint remains the same, or increases).  

    b. You can make other edits to your client's program: 

  1. Name in ‘User Details’ tab; 
  2. Password in ‘Password’ tab; 
  3. Group Acronym in ‘Site Details’ tab; 
  4. Program Start Date, or Exercise Dosage in the ‘Program Details’ tab; 

5. Don’t forget to click ‘Save’ once you’re done!  
a. You will see a green ‘Record Saved’ message if changes are successful.  
b. If you see a red error message, confirm all fields with a red asterisk have been filled in, and any changes to the password still fulfils the requirements (10 characters; 1 upper & lower case; 1 number). 

Resident Expert

FAQ & tech support for the Resident Expert 

As the Resident Experts, you may be asked to help with troubleshooting CMS, or StandingTall issues. Use the above guides, and the comprehensive training manual (found in the 'Training' tab), and read through the list of FAQ (found in the 'FAQ' tab) for assistance. 

As always, contact the StandingTall team at NeuRA on standingtall@neura.edu.au for further support!